Linux Panda

Open Source | Linux | Android | Tech

Things to do after installing Debian 9 “Stretch”


Debian Stretch


In this guide, we are going to see a list of few basic things to do after installing Debian Stretch.

One of the first things to do is to update the sources and then grant sudo access to the default user so that we don’t need to switch user as root to perform operations that require root access. Granting sudo access to users on Home PC’s is ok but granting sudo access to users in an office environment is not recommended.


Update The Source List

Note: I would like to let you know that in this guide, we are going to install software from the “contrib” and “non-free” repositories too.

Also we are going to add “contrib” & “non-freerepositories that are not 100% FOSS as per the Debian Free Software Guidelines.

  • contrib” – repositories include packages which do comply with the DFSG, but may fail other requirements. For instance, they may depend on packages which are in non-free or requires such for building them.
  • non-free” – repositories include packages which do not comply with the DFSG

If you want to use a installation that is 100% FOSS as per the Debian Free Software Guidelines then just don’t add “contrib” & “non-free” to the source list.

Read more of this post

Improve Font Rendering in Fedora Linux

In this guide, we are going to see the steps to improve the font rendering and make Fedora font rendering like Ubuntu using Infinality font. I’m not going to add any before/after screenshots as the font rendering will differ from display to display based on the resolution, the pixel density etc.


Fedora


Method 1 – Using Liberation Fonts

We are going to install Liberation fonts from Fedora Repository which serves as replacement MS fonts namely, Times New Roman, Arial, and Courier New. The Liberation fonts package will install Sans, Serif, and Monospace, Narrow families.

Go to the Liberation Fonts Build page and download the latest 2.x version binary TTF package.

Then extract it using an archive manager or by running the following command,
tar -xvf liberation-fonts-ttf-2*.tar.gz

Make the liberation directory in /usr/share/fonts/ by running the following command,
sudo mkdir -p /usr/share/fonts/truetype/liberation


Now we have to copy all the TTF files to /usr/share/fonts/truetype/liberation directory.

Lets browse to the directory which has the liberation fonts and then copy it to the liberation fonts directory that we created in the above step and then cache the newly installed fonts by running the following commands,
cd liberation-fonts-ttf-2*
sudo cp *.ttf /usr/share/fonts/truetype/liberation/
sudo fc-cache

Read more of this post

Android Nexus USB OTG Without Root

One of the awesome features of some Android phones & tablets is the the USB OTG technology. This USB OTG technology allows us to connect USB devices to an Android device. In this tutorial, we are going to see how to connect devices to Android nexus USB OTG without root access.

OTG – What it is and what it does

  • The term OTG stands for On-The-Go and it is often called as USB OTG or just OTG.
  • OTG technology allows us to connect an Android device to USB storage devices, flash disks, mouse/keyboard or even a USB gaming controller.
  • OTG technology allows us to transfer documents, pictures, music, video etc. from the USB storage.


USB OTG Cable


USB OTG Connectors

Read more of this post

Apt Pinning Debian Multimedia Using Preferences

In this guide, we are going to see the steps to apt pinning Debian Multimedia repo using preferences in Debian.


Debian


Disclaimer:

Before we proceed, I want to let you know that even though the steps in this guide works in my Debian installation properly, it does not mean that the Apt-Pinning method used in this guide may work properly in your system too and/or may break the installation.

So please read more about Apt-Pinning in the Debian Wiki before proceeding further.


Multimedia codecs (3rd party repo)

If you want to install w32codecs and libdvdcss2 (required for the decryption of CSS protected-DVD), then you need to add the 3rd party repository deb-multimedia to do that.

Now open /etc/apt/sources.list and add the deb-multimedia repository.
sudo vi /etc/apt/sources.list


Add the following lines to the sources.list,

#Debian Multimedia
deb http://www.deb-multimedia.org jessie main non-free
deb-src http://www.deb-multimedia.org jessie main non-free

Now we have to deal with one more issue. Both debian.org and deb-multimedia.org host packages with same names in their repositories.

So we have to set apt pinning in such a way that the packages with same names that exist in both the repositories are downloaded from debian.org and not deb-multimedia.org.

Read more of this post

Things to do after installing Debian 8 “jessie”

Keep Calm and Install Debian Jessie


In this guide, we are going to see the list of top/important things to do after installing Debian Jessie.

One of the first things to do is to update the sources and then grant sudo access to the default user so that we don’t need to switch user as root to perform operations that require root access. Granting sudo access to users on Home PC’s is ok but granting sudo access to users in an office environment is not recommended.


Update The Source List

Note: I would like to let you know that in this guide, we are going to install software from the “contrib” and “non-free” repositories too.

Also we are going to add “contrib” & “non-freerepositories that are not 100% FOSS as per the Debian Free Software Guidelines.

  • contrib” – repositories include packages which do comply with the DFSG, but may fail other requirements. For instance, they may depend on packages which are in non-free or requires such for building them.
  • non-free” – repositories include packages which do not comply with the DFSG

If you want to use a installation that is 100% FOSS as per the Debian Free Software Guidelines then just don’t add “contrib” & “non-free” to the source list.

Read more of this post

Guide – How to install Debian 8 “jessie” Xfce using netinst/minimal iso (Step-by-step with pictures)

Debian testingcurrently aliased jessie, contains software being tested for inclusion in the next major release.

The packages included in this distribution have had some testing in unstable but they may not be completely fit for release yet. It contains more modern packages than stable but older than unstable. This distribution is updated continually until it enters the “frozen” state.

Security updates for testing distribution are provided by Debian testing security team.


Keep Calm and Install Debian Jessie


In this article, we are going to learn to install & setup Debian Xfce “jessie” testing from scratch using netinst/minimal iso which is around 300MB in size.

Note: This method of installing Debian requires a functioning internet connection during installation.

Although both Ethernet and wireless connections are supported, a wired Ethernet connection is better. This method requires internet connection because only minimal packages as opposed to the full version and the other stuff has to be downloaded during installation.


Step 1: Download the ISO & make a bootable disk

Download the iso & make a bootable usb drive using software like “Unetbootin” or some other similar software that lets you copy iso files to a usb drive & make it bootable.

You can find the weekly builds of all architecture & all formats in this link, http://cdimage.debian.org/cdimage/weekly-builds/.

Here are the direct links to download the weekly builds of the testing iso,

If you don’t know which version to download then check this article, The Ultimate Guide to the Best Linux Distros. Read more of this post

The Ultimate Guide to the Best Linux Distros

Before we jump into the actual distro list, first lets take a look at 32bit vs 64bit versions and the different desktop environments.

Linux_Tux

32bit vs 64bit:

Each & every release of Linux distro are released in 2 variants namely 32bit & 64bit. So which variant to download, install & use?

You should use,

  • 32bit – If your PC has a 32bit processor
  • 64bit – If your PC has a 64bit processor

In addition to that, 32bit variants can support only upto 4GB of RAM. So again,

  • 32bit – If your PC has 4GB or less than 4GB of RAM
  • 64bit – If your PC has more than 4GB of RAM

Codenames:

32bit variants usually have the name pattern similar to,

  • DISTRONAME-x86.iso
  • DISTRONAME-i386.iso
  • DISTRONAME-i586.iso
  • DISTRONAME-i686.iso

64bit variants usually have the name pattern similar to,

  • DISTRONAME-x86_64.iso
  • DISTRONAME-amd64.iso

In simple terms, if the file name has the number 64 then its probably the 64-bit variant.

Read more of this post

Regex to get youtube video/playlist id with time & generate embed code

To embed youtube videos in a website, the best solution is to parse a string to match for youtube url and then grab the youtube VIDEO_ID or PLAYLIST_ID from the url and then use that video id in a standard embed code.

This is one of the ultimately best regex (regular expression) pattern to get/grab/parse youtube video id from any youtube link/url.

This regex works

  1. with or without http/https
  2. with or without www
  3. with both youtube.com & youtu.be links

This regex can be used to grab

  1. youtube video id
  2. youtube playlist id


Read more of this post

Adieu to Ubuntu 10.04 LTS Desktop – which was the King of Linux Distros during its time

Its time to bid adieu to Ubuntu 10.04 LTS desktop codenamed “Lucid Lynx” which was the 12th release of Ubuntu and the third LTS release by Canonical as the official support ends today.  Canonical won’t release anymore bug or security fixes/updates for Ubuntu 10.04 LTS desktop.


Ubuntu_10.04LTS_Live_Mode

Read more of this post

How to improve font rendering in Manjaro Linux by installing Infinality fonts

Updated on 1 June 2016.


Disclaimer/Warning: I’m not responsible if you break your Manjaro installation following this tutorial.


I want to let you know that this tutorial involves installing packages “directly from the Arch User Repository” and the Manjaro Wiki itself warns that

Warning: Use the AUR at your own risk! Support will not be provided by the Manjaro team for any issues that may arise relating to software installations from the AUR.

So if you’re proceeding with this tutorial, please proceed at your own risk.


Before we start, please, back up your /etc/fonts directory so that you can restore it if you want to go back to the stock fonts.

This guide is split into 2 methods.

  • 1st method shows how to install Infinality fonts using bohoomil repository.
  • 2nd method shows how to install Infinality fonts using AUR.


Steps to install Infinality fonts

Method 1: Using Infinality Repository

The easy way is to use the Infinality fonts from bohoomil repository.

We are going to install 3 packages called as

  1. cairo-infinality-ultimate
  2. fontconfig-infinality-ultimate
  3. freetype2-infinality-ultimate

The first step is to add the bhoomil repository to pacman config file.

Run the following code to open the repository configuration file.
sudo vim /etc/pacman.conf

The above command will probably show an error in your machine since vim is not installed by default.

Replace vim with your preferred text editor, i.e. if you like to use nano, then
sudo nano /etc/pacman.conf

After opening the file, go to the end of the file and add the following lines,

# Infinality Fonts Bundle
[infinality-bundle]
Server = http://bohoomil.com/repo/$arch

Save and close the file.

Next step is to import & sign the keys.

To import the new key, run the following command,
sudo pacman-key -r 962DDE58

To sign the new key, run the following command,
sudo pacman-key --lsign-key 962DDE58

The next step is to update our system to get the information about the available packages in the bhoomil repository.
sudo pacman -Syy

To install infinality fonts, run with the following command,
sudo pacman -S infinality-bundle

Now you’ll be asked whether the system should remove the old fonts and proceeed with the installation. You have to type y (i.e. yes) & press enter.


Method 2: Using AUR

The other way (or hard way as I call it) is to install Infinality packages from AUR.

We are going to install 3 packages called as

  1. cairo-infinality
  2. fontconfig-infinality
  3. freetype2-infinality

To install infinality fonts, run with the following command,
yaourt -S cairo-infinality fontconfig-infinality freetype2-infinality

The process will start building the files.  Since we’re installing the package using yaourt from AUR (Arch User Repository), it’ll show some warning/options.

Be careful about what you type and press enter, because entering wrong options may break the installation/system.

So make sure you read each prompt properly before entering anything, else you could end up aborting the installation by accident!

Here are a few examples of the warnings that will show up.

( Unsupported package: Potentially dangerous ! )
Edit PKGBUILD ? [Y/n] (“A” to abort)

We don’t need to edit the PKGBUILD file, so type the letter n & press enter.


Edit install.sh ? [Y/n] (“A” to abort)

We don’t need  to edit the install script, so type the letter n & press enter.


Continue building fontconfig-infinality ? [Y/n]

Type the letter y & press enter to continue the build process.


fontconfig-infinality and fontconfig are in conflict. Remove fontconfig? [y/N]

Yes, we have to remove the packages that are in conflict. So we have to type the letter y & press enter.


Continue installing fontconfig-infinality ? [Y/n]

Ofcourse, type the letter y & press enter.


Steps to configure font rendering
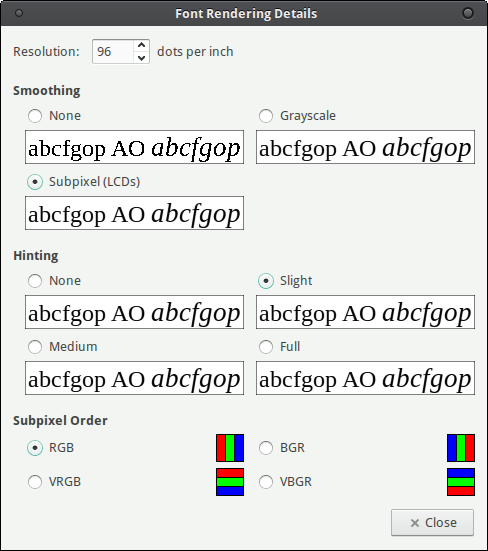
LCD Filter

We have to set “lcdfilter” setting to default for best font rendering.

To do that, browse to /etc/fonts/conf.d/,
cd /etc/fonts/conf.d/

and run the following code.
sudo ln -s ../conf.avail/11-lcdfilter-default.conf

If you want to use lcdlegacy or other config, then you have to add the respective symbolic link instead of the above command.

For more information on using preset font configuration, check the font configuration in arch wiki.
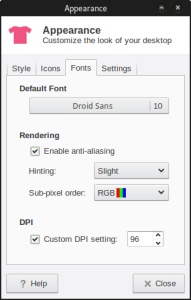
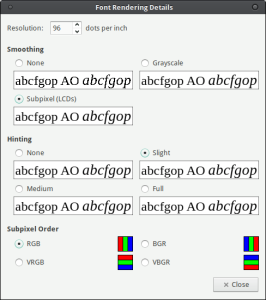
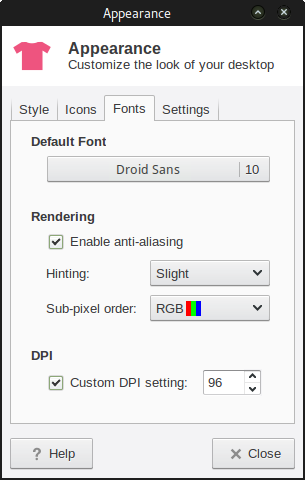
 

Fonts & Hinting

You may choose different font as per your preference and may use “slight or full” hinting depending on your preference.

Xfce

Go to, Settings -> Appearance -> Fonts

Xfce Font Settings

MATE

Go to, System -> Preferences -> Look & Feel -> Appearance

Xfce Font Settings


MATE Font Rendering Settings


Infinality – Custom Styles (Optional)

Infinality fonts comes with multiple pre-defined styles.

So if you want to choose another style, then you have to copy the “infinality-settings.sh” file available at /usr/share/doc/freetype2-infinality-ultimate/ to /etc/X11/xinit/xinitrc.d/.

To do that, run the following command,
sudo cp /usr/share/doc/freetype2-infinality-ultimate/infinality-settings.sh /etc/X11/xinit/xinitrc.d/

Now lets open the file to set another style,
sudo vim /etc/X11/xinit/xinitrc.d/infinality-settings.sh

In that file you can see that 2 levels of customization are available.

  1. A set of 7 preconfigured styles selectable by name.
  2. You can create your own custom style.

In this tutorial, we are going to see only the first level customization, which is changing the preconfigured styles.

### Available styles:
### ultimate1 <> extra sharp
### ultimate2 <> sharper & lighter ultimate
### ultimate3 <> ultimate: well balanced (default)
### ultimate4 <> darker & smoother
### ultimate5 <> darkest & heaviest (“MacIsh”)
### osx <> Apple OS X
### windowsxp <> MS Windows XP

### If you want to use a style from the list, uncomment the variable below
### and set its name as the value.

#export INFINALITY_FT=”ultimate3″

We have to uncomment the last line, i.e. remove the # symbol before the export INFINALITYFT=”ultimate3″, so that it looks like the following,

### Available styles:
### ultimate1 <> extra sharp
### ultimate2 <> sharper & lighter ultimate
### ultimate3 <> ultimate: well balanced (default)
### ultimate4 <> darker & smoother
### ultimate5 <> darkest & heaviest (“MacIsh”)
### osx <> Apple OS X
### windowsxp <> MS Windows XP

### If you want to use a style from the list, uncomment the variable below
### and set its name as the value.

export INFINALITY_FT=”ultimate3″

Now you can choose either of the styles available which are,

  • ultimate1
  • ultimate2
  • ultimate3
  • ultimate4
  • ultimate5
  • osx
  • windowsxp

so, if you want to use extra sharp fonts, then the export option should look like the following,
export INFINALITY_FT="ultimate1"

Save & close the file.

If you want to create your own custom style (i.e. second level customization), then you can do so by referring to the document available at /usr/share/doc/freetype2-infinality-ultimate/infinality-settings-generic.


Reboot to see the new font rendering.


Note: Once you have rebooted, you don’t need to reboot again. You just need to logout & login to try the different styles in “infinality-settings.sh” file.


Install MS fonts: (Optional)

If you want to install MS fonts, then you can do so by running the following command.

yaourt -S ttf-ms-win10


Restore stock fonts

If you’re still not happy with the font rendering and want revert back to the stock fonts then run the following command to restore/revert back to the stock fonts and then reboot.

pacman -S --asdeps freetype2 cairo fontconfig